
In World of Warcraft, a critical aspect that can significantly boost your experience is the variety of WoW addons. These are not mere modifications or simple tweaks; they are must-have tools ingeniously woven into the game’s fabric by a community of enthusiasts and experts.


Installing WoW Addons Manually: The Process Explained


- Download the Addons:
- First, you need to download the addons you want to use. Popular sources for WoW addons include websites like CurseForge (now part of Overwolf), WoWInterface, and Wago.io.
- Addons are usually downloaded as ZIP files.
- Locate the WoW Addons Folder:
- The addons folder is located in the World of Warcraft directory. The default path is usually C:\Program Files (x86)\World of Warcraft\_retail_\Interface\AddOns for the retail version of the game. For Classic WoW, the path will be similar but ends with _classic_ instead of _retail_.
- If you can’t find the folder, right-click the WoW icon you use to launch the game, select “Open file location,” and navigate from there.
- Extract the Addons:
- Extract the downloaded ZIP files using a file extraction program (such as WinRAR or 7-Zip).
- Once extracted, you’ll have a folder for each addon.
- Copy the Extracted Folders into the WoW Addons Folder:
- Copy the extracted addon folders and paste them into the AddOns folder inside the WoW directory.
- Ensure you’re copying the addon folder itself and not just the contents.
- Launch World of Warcraft:
- Start the game and log in.
- On the character select screen, click on the “AddOns” button in the lower-left corner.
- Here you can see a list of installed addons. You can enable or disable specific addons for each of your characters.
- Configure the Addons:
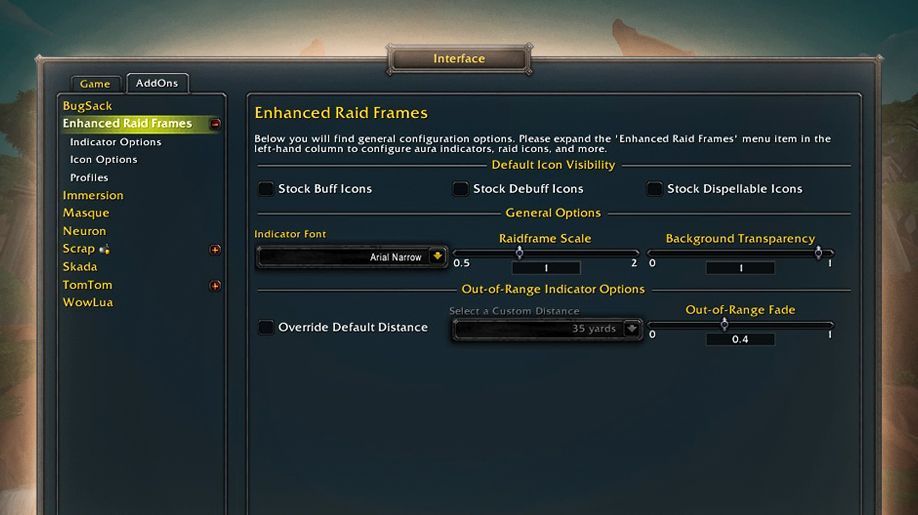
- Once in-game, most addons will have a settings menu where you can customize various options. This is usually accessible via the game’s interface options or a separate menu.
- Updates:
- Remember that addons may need to be updated when WoW receives major updates. Some programs can automate this process. Read more about them below.
WoW AddOn Managers: Windows and MacOS

- Functionality:
- Automated Installation and Updates: This software can automatically install addons and keep them up-to-date. When WoW is updated, these managers ensure your addons are compatible with the latest version.
- Simplified Management: They provide a centralized platform to manage all your addons, allowing you to enable, disable, or delete them easily.
- Popular Addon Managers:
- CurseForge: Integrated with the Overwolf platform, CurseForge is one of the most popular addon managers. It offers a vast choice and an intuitive interface for managing them. Here’s their official site: https://www.curseforge.com/wow.
- WoWUp: An open-source addon manager, WoWUp is known for its simplicity and ease of use. It allows users to quickly update their addons and is compatible with multiple repositories. It’s a perfect solution for Mac users, granting a user-friendly interface and a wide range of opportunities. Check https://wowup.io/ for more information.
- Ajour: A newer addition to the addon manager scene, Ajour is lightweight and focuses on performance and simplicity. It supports multiple game clients and is quickly gaining popularity for its clean design.
- Overwolf: While Overwolf itself is not an addon manager, it hosts CurseForge and offers additional gaming-related features and overlays.
- Advantages:
- Time-Saving: Automating the update process saves a significant amount of time, especially for players who use a lot of addons.
- Reduced Errors: Manual updates can sometimes lead to errors or conflicts; addon managers minimize these issues.
- Discoverability: They provide easy access to a vast library, making it simpler to discover new mods that can enhance your gaming experience.
- How to Use:
- After downloading and installing an addon manager, you can link it to your WoW directory.
- The manager will display your current addons and allow you to search and install new ones.
- Regularly open the manager to check for and apply updates.
- Safety and Reliability:
- Reputable managers ensure that the addons sourced through them are safe and free from malicious software.
- It’s important to download these managers from their official websites to avoid potential security risks.
Uninstalling WoW Addons: How do you delete them?

- Close World of Warcraft: Before making changes to addons, make sure WoW is completely closed. This ensures that the game does not overwrite your changes when it closes.
- Access the WoW Addons Folder:
- Navigate to the WoW directory where the game is installed. The default path is usually something like C:\Program Files (x86)\World of Warcraft\_retail_\Interface\AddOns for the retail version of WoW. For WoW Classic, the directory ends in _classic_ instead of _retail_.
- If you’re unsure where WoW is installed, right-click the WoW shortcut icon and select “Open file location”.
- Locate and Delete the Addons:
- Inside the AddOns folder, you’ll find separate folders for each of them.
- To uninstall an addon, delete its corresponding folder. For example, if you want to remove an addon named “Example123», you would find and delete the “Example123» folder.
- Confirm Changes in the Game:
- After deleting the addon folders, launch World of Warcraft.
- On the character select screen, click on the “AddOns” button in the lower-left corner. Here, you should see that the ones you deleted are no longer listed.
- Clear Saved Settings (Optional):
- If you want to remove any saved settings associated with the addons, you will also need to delete their corresponding files in the WTF folder, typically located at C:\Program Files (x86)\World of Warcraft\_retail_\WTF (or _classic_ for Classic WoW).
- Be cautious when deleting files from the WTF folder, as it contains all your in-game settings. Only delete files that you know are related to the addon you’re removing.
- Using an Addon Manager (Optional):
- If you have installed an addon manager like CurseForge, WoWUp, or Ajour, you can also uninstall addons using these tools. They often provide a more user-friendly interface to manage your collection, including uninstallation.


Comments: